
First things first: yes, it has been a really long time since I did one of these. No, I didn’t lose interest, die, or get abducted. I did get stuck in an elevator, but only for about 30 minutes so I can’t really blame that. My computer cord broke. I refuse to use another computer and apparently, my computer doesn’t exist in this world anymore. Universal chargers don’t fit it. Lucky for me, I found out Shane has a soldering iron, so we fixed the charger and here we are. Back in business. Now on to the buttercream!
This is THE recipe. The one recipe you need for baking cakes and cupcakes. Seriously. I used to hate buttercream because it made your teeth hurt from being so sickly sweet. This one isn’t like that. This one is AMAZING. You could bake the worst cupcake of your life and people won’t care as long as you put this frosting on it. Want to make boxed cake taste homemade? Put this buttercream on top and no one will ever know. I almost never stray from this recipe because it’s easy, and people lose their minds over it.
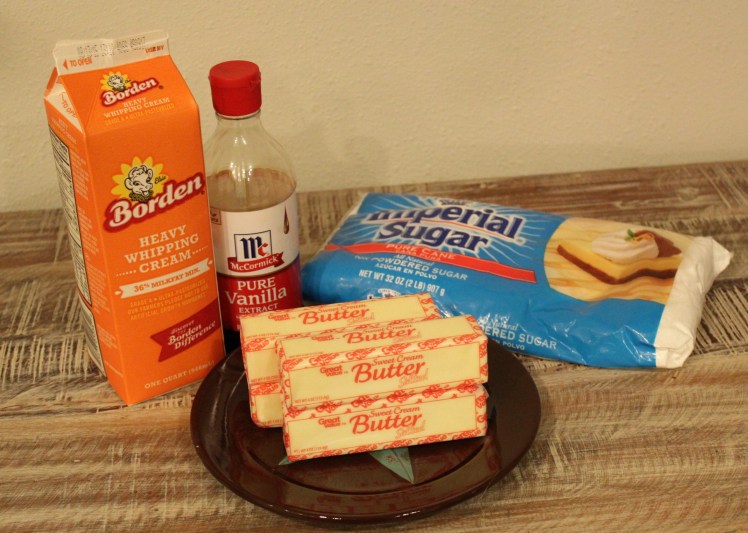
Only four ingredients are needed to make this stuff: 2 tsp vanilla extract, 3 TBS heavy whipping cream, 6 cups powdered sugar and 1 lb butter brought to room temperature. This list is for a double recipe because one isn’t enough to cover 24 cupcakes, but it’s easy enough to split in half if you’re only making 12.
First, add your soft butter and half your powdered sugar. If you have an industrial sized mixture that can accommodate six cups of powdered sugar without enveloping you in a white cloud of doom, then hooray for you, and knock yourself out. For those of us with normal kitchen sized mixers or (gasp) hand mixers, just do half the sugar first. Your lungs will thank you. Start your mixer slowly, and once the butter is coating the sugar, you should be safely past the threat of recreating an anthrax bomb in your kitchen. Now you can speed up your mixer until everything is evenly mixed.

At this point it’ll sort of, kind of look like frosting, just very heavy on the butter. Add the other three cups of powdered sugar. Once again mix slowly first, and then increase the speed. Once it’s evenly mixed, add two teaspoons of vanilla extract and three tablespoons of heavy whipping cream. Mix on low for about 15-30 seconds and then let that baby rip…or whip…whichever you prefer. To be clear, I mean just a little over medium, I honestly haven’t found any dish that requires high speed on a Kitchenaid mixer… I think NASA designed it to launch mashed potatoes into space to feed hungry astronauts.

After about a minute, the stuff in the bowl should be amazingly good frosting. If you want to dye it colors, it does very well with the Wilton gels. If you want more than one color, just separate into bowls and dye each one individually. At this point you are ready to ice your cake or cupcakes…or just get a spoon and eat the stuff, no judgement here. It goes very well with pretzels, fruit, bagels, breakups, etc…

For cupcakes, I use the Wilton disposable bags and a Wilton 1M tip. This is the very large open star tip. It’s the best for pretty looking cupcakes. I love this tip more than I care to admit. If you asked me for a kidney or my 1M tip, I’d have to do some serious thinking…

Fold your bag over at the top and slide your fingers into the space you created like in the picture above.

Use a spatula to put icing down past the fold in the bag. See how my thumb is positioned in the picture? Once the icing is down past that point, use your thumb to scrape the icing off the spatula. Trust me, this gets WAY easier the more you do it.

Add more icing, pushing the original icing further down into the bag and then scrape the spatula on the top of the folded bag.

Now unfold your bag, and your icing will be far enough down so you don’t have a mess. Just squish the icing down towards the tip making sure none of it is traveling up towards messy disaster Now just twist your bag at the top and you’re ready to go. If you want to rubber band it you can, I don’t have the patience for that. Translation: I don’t have rubber bands.

I like to fill my cupcakes, so press your tip down into your cupcake as shown above. Yes, those are blue cupcakes, that’s a post for another day. Don’t push so far down that you hit the bottom of the cupcake, or it will fall apart when you take the wrapper off. I usually go about two thirds of the way. Notice the icing bag is straight up. It needs to be that way the entire time you ice your cupcake. One of the most common errors is tilting your bag which will give you a sloppy, messy cupcake.

Slowly squeeze with even pressure, while backing your bag out of the cupcake. You don’t want to put too much, or you’ll break apart the cake. In the picture above, I’ve lifted up after filling the center. I only did that to show how it’s filled, normally you don’t want to pick up, you’ll simply start your cupcake swirls from that point in one smooth motion.


The pictures above show the correct way to frost the perfect cupcake. Start in the center from your frosting core. Keeping the bag upright and squeezing frosting with steady pressure as you go, move to the outside of the cupcake to begin your first swirl. You don’t have to swirl the bag or the cupcake, the icing tip will do it for you, just go in a circle around the outside. Once the outside is covered, move in for the second swirl, and then the third. The third is very small and quick, when you reach the top, pull the bag straight up to get the pointy top on the cupcake. The top two layers will rest on the layers under them and on the bit you squeezed out while you were moving from the center to the outside.

All done! Decorate or just leave as is! As you can see, I put some firework toppers and red and blue sprinkles. I usually store mine in the fridge because I live in super humidity and I don’t want the icing to get too soft and wilt. On the day I’m serving them, I just pull them out about 30 minutes to an hour ahead of time and let them sit so the frosting is nice, soft and fluffy. When it’s not as humid, I’ve left these out all day and even overnight and they’ve been just fine. If you are frosting cakes or cupcakes, frost them as soon as you’re done making the frosting or it’ll get too soft and won’t look as pretty on the cake!
ENJOY!!!


Looks so professional! I have never use cream in buttercream before! I will definitely follow! I would really appreciate it if you would check my blog out too- https://thebakingblogsite.wordpress.com
LikeLiked by 1 person
Thank you!! I will definitely follow you!
LikeLike
Some great tips and your piping looks amazing! I will try out using whipped cream next time I make cupcakes! 😊
LikeLiked by 1 person
Thanks! Let me know how they turn out!! 😀
LikeLike